Battery switch on travel trailer function is key to understanding your RV’s electrical system. This guide will walk you through the different types of battery switches, their purpose, troubleshooting tips, and safe operation practices. We’ll cover everything from understanding how the switch manages power flow between your house batteries and the vehicle’s charging system to safely upgrading or replacing a faulty switch.
Get ready to become a battery switch expert!
We’ll explore the various types of switches – single-pole, double-pole, and double-pole double-throw – comparing their pros and cons. We’ll also delve into how the battery switch interacts with other systems like solar panels and inverters, ensuring you have a complete understanding of its role in your RV’s electrical setup. Finally, we’ll cover essential maintenance and safety procedures to keep your system running smoothly and safely.
Battery Switch Types in Travel Trailers
Choosing the right battery switch for your travel trailer is crucial for managing power and protecting your electrical system. Different switches offer varying levels of control and safety features. Understanding these differences will help you select the best option for your needs.
Battery Switch Types
Travel trailers typically utilize a few main types of battery switches: single-pole, double-pole, and double-pole double-throw. Each offers a different level of control over your battery banks and associated circuits. The choice depends on the complexity of your electrical system and your desired level of safety.
Single-Pole Battery Switches
A single-pole switch controls only one circuit. In a travel trailer context, this means it manages power to either one battery bank or a specific circuit within your system, such as the 12V house lights. They are the simplest and most affordable option.
Double-Pole Battery Switches
Double-pole switches control two circuits simultaneously. This is commonly used to isolate both positive and negative terminals of a battery bank from the rest of the electrical system. This provides a more complete disconnect, enhancing safety during maintenance or storage.
Double-Pole Double-Throw (DPDT) Battery Switches
DPDT switches offer the most control. They allow you to switch between two different battery banks (e.g., house battery and chassis battery) or select between shore power and battery power. This is useful in setups with multiple batteries for increased capacity or redundancy.
Comparison of Battery Switch Types
The following table summarizes the features, advantages, and disadvantages of each type:
| Type | Description | Advantages | Disadvantages |
|---|---|---|---|
| Single-Pole | Controls one circuit (positive or negative) | Simple, inexpensive, easy to install | Limited control, may not provide complete disconnect |
| Double-Pole | Controls two circuits (positive and negative) simultaneously | Provides a complete battery disconnect, enhances safety | More expensive than single-pole, slightly more complex installation |
| Double-Pole Double-Throw (DPDT) | Allows switching between two sources or battery banks | Maximum control, flexibility in managing multiple power sources | Most expensive, requires more advanced wiring and understanding |
Function and Purpose of the Battery Switch
The battery switch in your travel trailer is a crucial component of its electrical system, acting as the central control for your house batteries. It’s essentially a master on/off switch, allowing you to disconnect your house batteries from the rest of the trailer’s electrical system when needed. This seemingly simple function has significant implications for both battery life and the safety of your trailer’s electrical components.The battery switch manages the flow of power between your travel trailer’s house batteries and the charging system (either shore power, generator, or vehicle alternator).
When the switch is in the “on” position, power from the batteries can flow to the various appliances and systems in your trailer. Conversely, turning the switch to “off” completely isolates the house batteries, preventing any drain from parasitic loads (things that draw power even when the trailer isn’t in use, like some electronics or alarm systems). This is particularly important for long-term storage.
Battery Switch Operation and Power Flow
The switch typically has three positions: “On,” “Off,” and sometimes a “Battery Charge Only” position. “On” allows power to flow freely from the batteries to the trailer’s electrical system. “Off” completely disconnects the batteries, protecting them from discharge. The “Battery Charge Only” position (if present) allows the charging system to charge the batteries without allowing power to flow to the trailer’s systems.
This is useful for charging the batteries while preventing accidental discharge through parasitic loads. Imagine you’re storing your trailer for the winter; setting the switch to “Off” will prevent your batteries from draining completely, even with small parasitic draws. Similarly, using the “Battery Charge Only” position allows you to top off the batteries without running the risk of accidentally draining them through something left on in the trailer.
So, you’re planning a trip? Awesome! Don’t forget travel insurance! Check out Aon travel insurance for comprehensive coverage. They’ve got options for everything from lost luggage to medical emergencies. And if you’re into adventure travel, looking at Aon travel insurance might be a good idea too, as they often have specific plans for more active itineraries.
Getting insured is a smart move – peace of mind is priceless!
Preventing Battery Drain and Protecting Electrical Components
A primary reason for having a battery switch is to prevent unwanted battery drain. Parasitic draws, even small ones, can gradually deplete your batteries over time, leaving you with a dead battery when you need it most. Turning the switch to “Off” when the trailer is not in use effectively eliminates this problem.Furthermore, the battery switch offers protection for the trailer’s electrical components.
In the event of a short circuit or other electrical fault, the switch can be used to quickly isolate the batteries, preventing further damage. This quick disconnect is a crucial safety feature, protecting both your batteries and your trailer’s wiring from potential damage. Consider a scenario where a faulty appliance causes a short circuit. Switching the battery off immediately limits the extent of damage, preventing a potential fire hazard.
Troubleshooting Common Battery Switch Issues
Your travel trailer’s battery switch is a crucial component, and problems with it can leave you stranded. Understanding common issues and how to troubleshoot them is essential for maintaining power and avoiding frustrating breakdowns. This section will guide you through diagnosing and resolving typical battery switch problems.
Common Battery Switch Problems
Several issues can arise with your travel trailer’s battery switch, often stemming from the harsh conditions it faces. These problems can range from simple fixes to more involved repairs. Knowing what to look for can save you time and potential frustration.
- Corrosion: Exposure to moisture and the elements can cause corrosion on the switch terminals and connections. This buildup of oxides prevents proper electrical contact, leading to poor performance or complete failure.
- Loose Connections: Vibrations during travel can loosen the connections at the battery switch, terminals, or even the wiring itself. Loose connections lead to intermittent power or complete power loss.
- Faulty Switch: Over time, the internal components of the battery switch can wear out or fail. This might manifest as an inability to switch power on or off, or the switch might become stuck in a particular position.
Diagnosing Battery Switch Problems
Before you start replacing parts, systematic diagnosis is crucial. This approach helps you identify the precise problem and avoid unnecessary repairs.
A visual inspection is the first step. Carefully examine the battery switch and its connections for signs of corrosion (greenish or whitish buildup), loose wires, or any physical damage to the switch itself. Pay close attention to the terminals and the points where wires connect to the switch. Look for any obvious signs of melting or burning. A simple flashlight can be very helpful in this inspection.
Next, use a multimeter to test the voltage. First, ensure your multimeter is set to the appropriate voltage range (DC voltage). Check the voltage at the battery terminals directly. If the voltage is low or absent, you have a battery problem (not a switch problem). If the voltage is good, check the voltage at the output side of the switch (where the wires lead to your trailer).
A significant voltage drop between the battery and the output indicates a problem with the switch or its connections. A reading of 0 volts indicates a complete break in the circuit.
Troubleshooting Flowchart
A systematic approach will help resolve common battery switch issues. This flowchart Artikels the steps to follow:
- Visual Inspection: Check for corrosion, loose connections, or physical damage to the switch and wiring.
- Voltage Test (Battery): Measure the voltage directly at the battery terminals. If low or zero, address the battery issue first.
- Voltage Test (Switch Output): Measure the voltage at the output of the battery switch. A significant voltage drop indicates a problem with the switch or its connections.
- Clean Corrosion: If corrosion is present, carefully clean the terminals and connections using a wire brush and a corrosion remover. Ensure all connections are clean and tight.
- Tighten Connections: If connections are loose, tighten them securely. Use appropriate tools to avoid damaging the wires or terminals.
- Replace the Switch: If cleaning and tightening connections don’t resolve the issue, the battery switch itself may be faulty and needs replacing. Always use a switch with the correct amperage rating for your system.
Safe Battery Switch Operation and Maintenance
Proper operation and maintenance of your travel trailer’s battery switch are crucial for safety and the longevity of your battery system. Neglecting these aspects can lead to corrosion, premature battery failure, and even fire hazards. Regular attention to detail will ensure your batteries perform reliably and safely for years to come.Regular inspection and cleaning are key to preventing problems before they arise.
A dirty or corroded switch can impede current flow, leading to reduced battery performance and potential overheating. Furthermore, loose connections can create resistance and generate heat, posing a fire risk. Therefore, a proactive approach to maintenance is vital.
Battery Switch Inspection and Cleaning
Inspect your battery switch at least every three months, or more frequently if you’re in a humid or salty environment. Look for signs of corrosion (white, green, or blue deposits) on the switch terminals and connecting wires. Use a wire brush to carefully clean away any corrosion. For stubborn corrosion, a baking soda and water paste can be effective.
After cleaning, apply a thin layer of dielectric grease to the terminals to prevent future corrosion and ensure a good connection. Visually check the switch itself for any damage or cracks. If you notice any significant wear, replace the switch immediately. Remember to always disconnect the battery before performing any maintenance.
Safe Disconnection and Reconnection Procedures
Before disconnecting the battery switch, always ensure your travel trailer is completely disconnected from shore power. This prevents any potential backfeed that could cause sparks or shocks. Turn the battery switch to the “OFF” position. Then, disconnect the negative (-) cable from the battery first, using a wrench or pliers. This is a crucial safety precaution, as it eliminates the risk of accidental short circuits.
So, you’re planning a trip? Awesome! Don’t forget travel insurance – it’s a lifesaver. Check out Aon travel insurance for comprehensive coverage; they’re pretty solid. Then, before you book anything, also look at Aon travel insurance options, just to compare prices and benefits. Getting the best deal is key, right?
Make sure you read the fine print, though, to understand exactly what’s covered. Happy travels!
Once the negative cable is disconnected, you can then disconnect the positive (+) cable. Reconnect the cables in the reverse order: positive (+) first, then negative (-). Always ensure the connections are tight and secure before turning the switch back to the “ON” position. Avoid touching metal parts of the battery or switch while performing these operations.
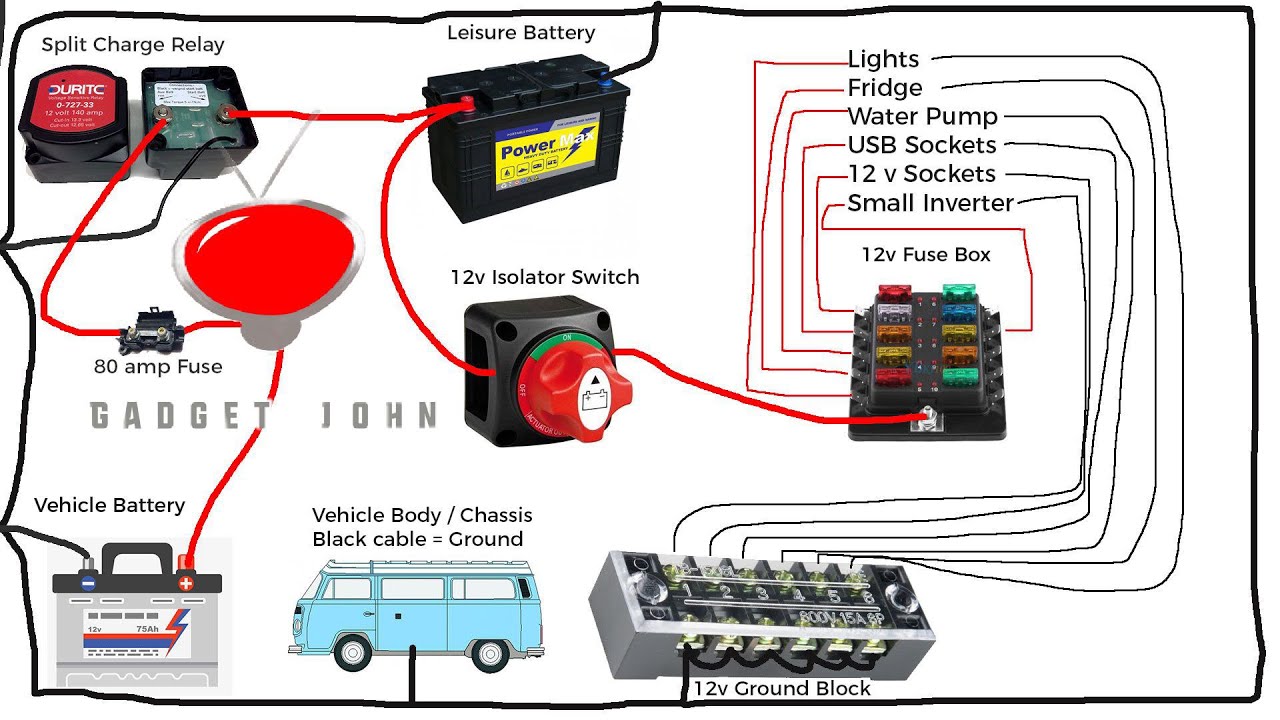
Battery Switch Integration with Other Systems

Your travel trailer’s battery switch isn’t just a simple on/off switch; it’s a crucial component in managing power flow between your batteries and other electrical systems. Understanding its interaction with these systems is key to efficient and safe power management, whether you’re hooked up to shore power or completely off-grid. This section details how the battery switch works in conjunction with solar panels, inverters, and converters.The battery switch acts as a central control point, determining which systems can access the power stored in your trailer’s batteries.
Its position dictates the flow of DC power (from the batteries) and its interaction with AC power (from shore power or a generator). This control is vital for preventing battery drain, protecting sensitive electronics, and maximizing the use of your various power sources.
Power Distribution During Different Operational Modes
The battery switch’s role changes significantly depending on whether your trailer is connected to shore power or operating off-grid. When connected to shore power, the converter typically charges the batteries and provides AC power to the trailer’s outlets and appliances. The battery switch, in the “off” position, prevents the batteries from discharging into the system and potentially overloading the converter.
In the “on” position, the batteries supplement the shore power, providing additional capacity for high-demand appliances. Off-grid, the battery switch becomes the primary control for your battery power, enabling you to use your stored energy to run lights, appliances (via an inverter), and other DC-powered devices.
Interaction with Solar Panels, Inverters, and Converters, Battery switch on travel trailer function
A typical setup involves several components interacting with the battery switch:
- Solar Panels: These generate DC power, which is usually routed through a charge controller before reaching the batteries. The battery switch controls whether this charged power can be used by other systems or remains stored in the batteries. If the switch is “off,” the solar panels still charge the batteries, but the power isn’t accessible to the trailer’s appliances.
- Inverter: An inverter converts DC power from the batteries into AC power, allowing you to run AC appliances while off-grid. The battery switch controls whether the inverter can draw power from the batteries. If the switch is “off,” the inverter won’t function, preventing accidental battery drain.
- Converter: The converter changes AC shore power into DC power to charge the batteries. The battery switch doesn’t directly control the converter’s charging function, but it does control the flow of DC power from the batteries to the trailer’s system. When the switch is “off,” it prevents the batteries from discharging back through the converter, protecting it from potential damage.
Diagram of Battery Switch Integration
Imagine a simplified diagram. The components are represented by boxes, and the lines represent the flow of electricity.
- Shore Power Inlet: This is where you connect to an external power source (campground hookup). It connects to the converter.
- Converter: This changes AC power from the shore power inlet to DC power to charge the batteries.
- Battery Switch: This is the central control point. It’s depicted as a switch with “ON” and “OFF” positions.
- Batteries: The storage for DC power.
- Solar Panel Charge Controller: Regulates the flow of DC power from the solar panels to the batteries.
- Solar Panels: Generate DC power from sunlight.
- Inverter: Converts DC power from the batteries to AC power for appliances.
- 12V DC System (Lights, Water Pump etc.): Appliances and systems that run directly on 12V DC power from the batteries.
- 120V AC System (Outlets, Air Conditioner etc.): Appliances that run on 120V AC power, usually supplied by the shore power or the inverter.
Connections: The shore power inlet connects to the converter. The converter connects to the batteries. The batteries connect to the battery switch. The battery switch connects to the 12V DC system and the inverter. The solar panels connect to the solar panel charge controller, which then connects to the batteries.
The inverter connects to the 120V AC system.
When the battery switch is “ON,” power flows from the batteries to the 12V DC system and the inverter. When the battery switch is “OFF,” this flow is interrupted. The solar panels still charge the batteries regardless of the switch’s position, unless there’s a separate disconnect.
Upgrading or Replacing a Battery Switch
Upgrading or replacing your travel trailer’s battery switch is a relatively straightforward task, but safety and proper wiring are paramount. A faulty switch can lead to electrical problems, potentially causing damage to your RV’s electrical system or even creating a fire hazard. This section Artikels the steps involved in safely upgrading or replacing your battery switch, ensuring your system remains reliable and safe.
Choosing a Replacement Battery Switch
Selecting the correct replacement battery switch is crucial. The primary consideration is the amperage rating. Your new switch must handle at least the same amperage as the old one, and ideally, a slightly higher rating to accommodate potential future upgrades. Check the amperage rating on your existing switch; it’s usually printed on the switch itself. You’ll also need to consider the type of switch: a simple on/off switch, or a more sophisticated switch with additional features like a disconnect or multiple battery banks.
Finally, ensure the replacement switch is compatible with your existing wiring and battery setup. For example, a switch designed for a single 12-volt battery won’t work with a dual-battery system.
Safe Removal of the Old Battery Switch
Before beginning any work, always disconnect the negative battery cable. This is the most crucial safety step to prevent accidental shorts and shocks. Then, carefully remove the wires connected to the old battery switch. Take pictures or make detailed notes of how each wire is connected to avoid confusion during reinstallation. Use a wire labeling system to further prevent confusion.
Once the wires are disconnected, carefully remove the old switch from its mounting location. Inspect the mounting location for any damage and clean it thoroughly before installing the new switch.
Installing the New Battery Switch
Mount the new battery switch securely in the same location as the old one, ensuring a snug fit. Refer to the manufacturer’s instructions for specific mounting details. Then, carefully reconnect the wires, following your notes or pictures. Double-check each connection to ensure it’s secure and correct. Pay close attention to the positive (+) and negative (-) terminals.
Incorrect wiring can lead to serious problems, including damage to your electrical system or personal injury. After reconnecting all wires, carefully reconnect the negative battery cable.
Testing the New Battery Switch
After installing the new battery switch, test its functionality. Turn the switch on and off several times, ensuring it operates smoothly. Check the voltage at the battery terminals to ensure power is flowing correctly when the switch is on and is interrupted when it is off. Use a multimeter to measure voltage. If everything seems correct, you’ve successfully upgraded or replaced your battery switch.
If you encounter any problems, double-check all connections and consult the manufacturer’s instructions or a qualified electrician.
Mastering your travel trailer’s battery switch is crucial for safe and efficient power management. By understanding the different types of switches, their functions, and troubleshooting techniques, you can confidently maintain your RV’s electrical system. Remember to always prioritize safety when working with electricity, and don’t hesitate to consult a professional if you’re unsure about any procedure. Happy travels!
FAQ Guide: Battery Switch On Travel Trailer Function
What happens if my battery switch is faulty?
A faulty switch can lead to power loss, battery drain, or even damage to electrical components. You might experience flickering lights, non-functioning appliances, or even a complete power outage.
How often should I inspect my battery switch?
Regularly inspect your battery switch, at least every few months, checking for corrosion, loose connections, and any signs of damage. Before and after each trip is a good habit.
Can I replace my battery switch myself?
While possible, replacing a battery switch requires electrical knowledge and caution. If you’re uncomfortable working with electricity, it’s best to consult a professional.
What size battery switch do I need?
The appropriate amperage rating for your battery switch depends on your RV’s electrical system and battery bank size. Consult your RV’s manual or a qualified electrician for the correct size.
